Creating Your Free Website with WordPress: A Step-by-Step Guide
Want to establish an online presence but worried about the cost? Creating a website for free is entirely possible with WordPress! WordPress.com offers a free plan that allows you to build a functional and visually appealing website without spending a dime. This guide will walk you through the process, step by step, ensuring you can launch your free WordPress website with ease.
Why Choose WordPress for Your Free Website?
WordPress is a powerful and versatile platform, even in its free version. Here are a few reasons why it's an excellent choice for creating your free website:
- User-Friendly Interface: WordPress boasts an intuitive interface that's easy to navigate, even for beginners. You don't need coding knowledge to create and manage your website.
- Customizable Themes: WordPress offers a wide range of free themes that you can customize to match your brand and style. These themes are pre-designed layouts that provide a starting point for your website's appearance.
- Essential Features: The free WordPress plan provides essential features like blog posts, pages, and basic customization options, allowing you to create a functional website.
- Scalability: While the free plan has limitations, WordPress allows you to upgrade to a paid plan later on if you need more features or storage space. This makes it a scalable solution as your website grows.
Step 1: Sign Up for a Free WordPress Account
The first step is to create a free account on WordPress.com. Here's how:
- Visit WordPress.com: Go to WordPress.com in your web browser.
- Click "Start Your Website": You'll find a prominent button that says "Start Your Website" or something similar. Click on it.
- Choose a Domain Name: You'll be prompted to choose a domain name for your website. Since you're using the free plan, your domain name will include "wordpress.com" (e.g., mywebsite.wordpress.com). Enter your desired website name and WordPress will suggest available options.
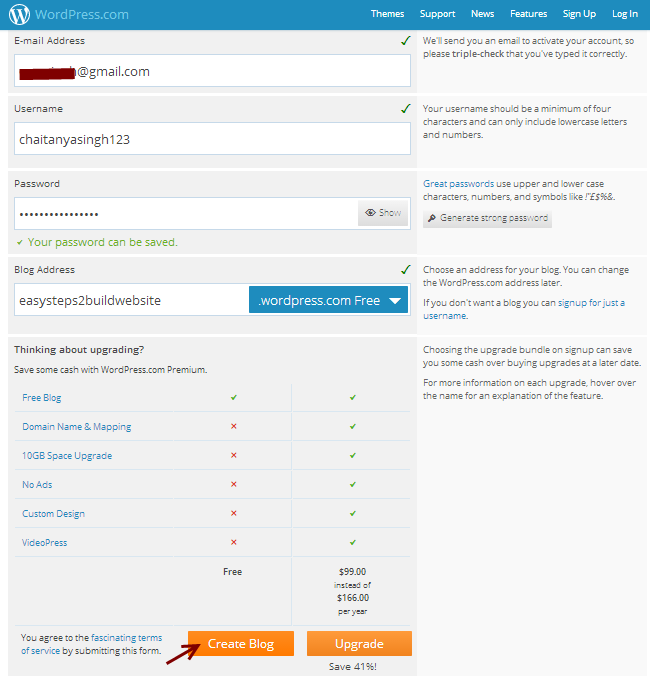
- Select a Plan: You'll be presented with different plan options. Choose the "Start with a free site" option. This is usually the smallest and most clearly labeled option.
- Create Your Account: Enter your email address, choose a username, and create a strong password. Alternatively, you can sign up using your Google or Apple account.
Step 2: Choose a Theme for Your Website
Once you've created your account, you'll be taken to the WordPress dashboard. The next step is to choose a theme for your website. Here's how:
- Navigate to "Appearance" > "Themes": In the left-hand menu of your WordPress dashboard, find the "Appearance" section and click on "Themes."
- Browse Free Themes: You'll see a selection of free themes available for your website. You can browse through them or use the search bar to find themes based on specific keywords (e.g., "blog," "business," "portfolio").
- Preview Themes: Before activating a theme, you can preview it to see how it will look on your website. Click on the "Live Preview" button to see a demo of the theme.
- Activate a Theme: Once you've found a theme you like, click on the "Activate" button to apply it to your website.
Step 3: Customize Your Website's Appearance
After activating a theme, you can customize its appearance to match your brand and style. Here's how:
- Navigate to "Appearance" > "Customize": In the left-hand menu of your WordPress dashboard, find the "Appearance" section and click on "Customize."
- Customize Theme Options: The Customizer allows you to change various aspects of your theme, such as the site title, tagline, colors, fonts, header image, and background image.
- Experiment with Different Settings: Explore the different options in the Customizer and experiment with different settings to see what looks best for your website.
- Save Your Changes: Once you're happy with your customizations, click on the "Publish" button to save your changes.
Step 4: Create Essential Pages for Your Website
Every website needs essential pages like a homepage, about page, and contact page. Here's how to create these pages in WordPress:
- Navigate to "Pages" > "Add New": In the left-hand menu of your WordPress dashboard, find the "Pages" section and click on "Add New."
- Add Content to Your Page: Use the WordPress editor to add content to your page. You can add text, images, videos, and other elements.
- Give Your Page a Title: Enter a title for your page in the "Title" field at the top of the editor.
- Publish Your Page: Once you're happy with your page's content, click on the "Publish" button to make it live on your website.
- Repeat for Other Pages: Repeat these steps to create other essential pages like your "About" page and "Contact" page.
Step 5: Create Blog Posts (Optional)
If you want to add a blog to your website, you can create blog posts. Here's how:
- Navigate to "Posts" > "Add New": In the left-hand menu of your WordPress dashboard, find the "Posts" section and click on "Add New."
- Add Content to Your Post: Use the WordPress editor to add content to your post. You can add text, images, videos, and other elements.
- Give Your Post a Title: Enter a title for your post in the "Title" field at the top of the editor.
- Add Categories and Tags: Use categories and tags to organize your blog posts. You can add them in the right-hand sidebar of the editor.
- Publish Your Post: Once you're happy with your post's content, click on the "Publish" button to make it live on your website.
Step 6: Set Up Your Website's Menu
A menu allows visitors to easily navigate your website. Here's how to set up your website's menu in WordPress:
- Navigate to "Appearance" > "Menus": In the left-hand menu of your WordPress dashboard, find the "Appearance" section and click on "Menus."
- Create a New Menu: Give your menu a name (e.g., "Main Menu") and click on the "Create Menu" button.
- Add Pages to Your Menu: Select the pages you want to add to your menu from the "Pages" section on the left. Click on the "Add to Menu" button.
- Arrange Menu Items: Drag and drop the menu items to arrange them in the desired order.
- Choose Menu Location: Select the location where you want your menu to appear on your website (e.g., "Primary Menu").
- Save Your Menu: Click on the "Save Menu" button to save your changes.
Step 7: Launch Your Website!
Once you've completed these steps, your free WordPress website is ready to launch! Visit your website's address (e.g., mywebsite.wordpress.com) to see your creation live. Share your website with the world and start building your online presence!
Considerations for the Free WordPress Plan
While the free WordPress plan is a great way to get started, it's important to be aware of its limitations:
- WordPress.com Subdomain: Your website address will include "wordpress.com."
- Limited Storage Space: The free plan offers limited storage space for your website's files.
- WordPress.com Ads: WordPress.com may display ads on your website.
- Limited Customization Options: The free plan has limited customization options compared to the paid plans.
- No Plugins: You cannot install plugins on the free WordPress plan.
If you need more features, storage space, or customization options, you can always upgrade to a paid WordPress plan later on.